
If you’ve decided to read this article, it means you’re already a somewhat more advanced user of the ClickUp system and you want to take your work with this tool to a higher level. This post aims to introduce you to the topic of custom fields, also known as “custom fields,” so you can fully leverage their potential.
What Are Custom Fields?
Additional customization options for the system to fit specific work and manage what you do in the ClickUp system are now available through so-called custom fields. This allows adding various additional elements to tasks, significantly streamlining the analysis of tasks. Custom fields can be added to lists, folders, or spaces, making them available to all tasks in a specific area.
To start using custom fields, you need to activate them in the ClickUp system. The main element that enables this at the workspace level is the settings and the “ClickApps” tab, as seen in the screenshot below. From this level, you can see that custom fields are currently used in 8 workspaces. Additionally, from the same tab, you can also block the use of these fields in specific spaces.

What Types of Custom Fields Are Available in the ClickUp System
ClickUp offers an impressively large base of custom fields, allowing you to customize and expand your project according to the unique needs of your team. With them, you have full control over how you organize and track your tasks, ensuring maximum flexibility and efficiency in project management.
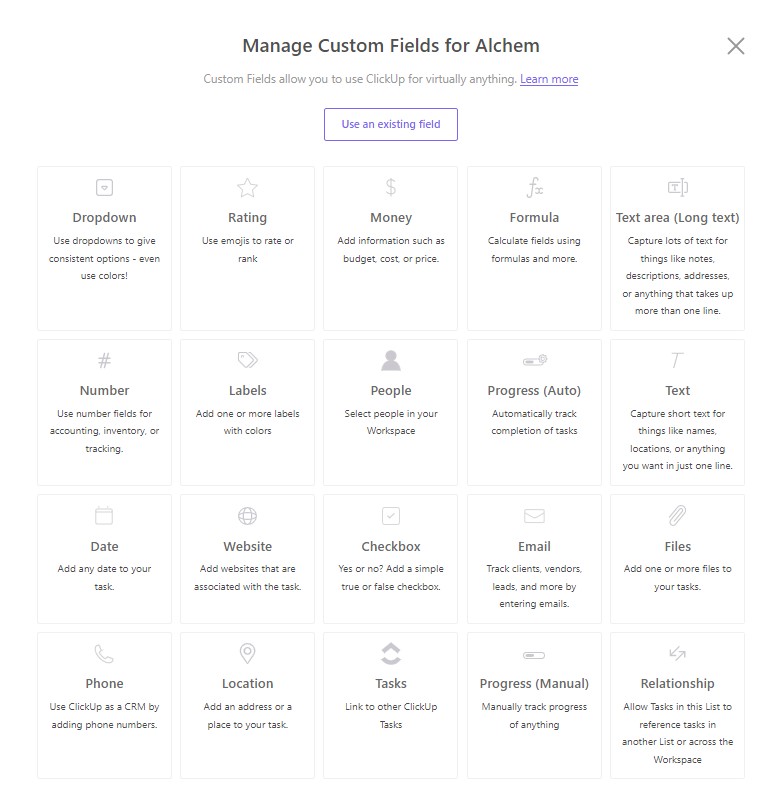
Let’s now discuss the various types of custom fields available in ClickUp – the order corresponds to the view available in the ClickUp system.
- Dropdown – Allows creating a dropdown list with the option to select only one item. For example, you can create a customer database and use this field to mark the industry in which a particular customer operates, or the source from which they come, such as “LinkedIn Campaign.”
- Rating – Used for rating or ranking, but there can be many more ideas.
- Money – Allows entering amounts, such as budget, costs, or prices (currency must be set).
- Formula – Allows using various available calculation formulas, based on other available custom fields or time (measured time and estimation).
- Text Area (Long) – Text field for entering longer texts with the option to use “enter.”
- Number – Used for entering numbers, enabling the analysis of various elements.
- Labels – Similar to Dropdown but allows selecting multiple items in one task, e.g., indicating which services your client already uses.
- People – Allows indicating specific users in the system, but it’s not the same as assigning a person to a task, e.g., during onboarding, you can specify the department manager where the new employee will work.
- Progress (Auto) – Allows tracking the progress of work on a task by displaying the percentage completion of subtasks or checklists.
- Text – Short text field that allows entering text on one line. The text can be longer, but we won’t use the “enter” key.
- Date – Used for entering dates, e.g., the date of sending an offer to a customer.
- Website – Not only for web addresses but can also be used for links to other systems or online documents.
- Checkbox – Allows checking “yes” or “no,” useful for indicating whether a particular customer has VIP status, for example.
- Email – Allows entering email addresses.
- Files – Allows adding various files directly to a specific field, which is an alternative to adding them to the task itself. This helps organize data, e.g., the field “Graphic files,” “Projects,” etc.
- Phone – As the name suggests, used for entering a phone number.
- Location – Used for entering address data, allowing the analysis of customer origins and is great when combined with the “map” view.
- Task – Allows indicating any task available in the system.
- Progress (Manual) – Similar to Progress (Auto), but here the progress is set manually, so you need to watch its setting, but it allows presenting progress in situations when something is being done outside of tasks in ClickUp.
- Relationship – Works like Task from point 18 but allows narrowing down the results to a specific list, facilitating work with tasks in different categories, e.g., in CRM, you can create a contact database.
How to Add Custom Fields
Adding custom fields in the ClickUp system is possible from various levels. Proper planning of this process is essential because it affects how they will function. For example, if you add a custom field from the space level, the entire structure within that space will use that field. The same applies to folders – all lists in a given folder will inherit the introduced custom fields. Therefore, if you want a custom field to work only in a specific list, you should add it from the level of that list.
Below is a description of three ways to add custom fields:
- Adding from the task level

At the bottom of the list of available custom fields, you’ll find the option “+ Add or edit fields”. Clicking on it will bring up a view for configuring existing fields, adding a new field, or using one already available in the system.

- Adding from the sidebar of the organizational structure, such as workspace, folder, or list:

After selecting the appropriate workspace, folder, or list (in our example, it is the “Space” workspace), simply click the three dots next to its name. Then, from the dropdown list, select “More settings,” and from there, navigate to “Custom fields.” - Adding from the task view, e.g., list, tableAdding from, for example, the list or table view, is incredibly simple. In every task view, there’s the option to add columns. This is done using the “+” symbol

After clicking, a panel will appear containing two options:
– “Show/Hide” – used to display or hide custom fields that are already available in this view.
– “New column” – used to create new custom fields. We can do this in two ways: we can click on the list of visible fields and create a new field, or click on the “Use field from library” option at the bottom of the panel.”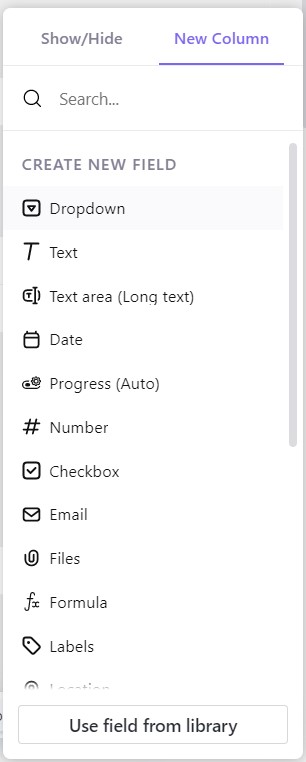
Examples of Using Custom Fields in the ClickUp System:
- ClickUp as a CRM: When using ClickUp to handle clients, you can make use of various custom fields such as phone number, email address, notes, lead statuses, deal stages, first and last contact dates, and fields for entering financial amounts.
- Budget Management: Custom fields significantly facilitate working with budgets, both yours and your client’s. With them, you can accurately specify costs and expenses, as well as use calculation fields for calculations and forecasts.
- Marketing plans and campaigns: If you use ClickUp to plan blog posts or create articles, it will help you better organize campaigns and define milestones and deadlines. You can create custom publication dates that differ from editing and design dates. You can also track different promotional channels, expenses on freelancers and contractors, and other details related to your marketing plans.”
It’s worth noting that custom fields in the ClickUp system are a key feature that significantly increases the flexibility of this tool. They allow you to tailor ClickUp to specific work and organization, enabling more efficient task management and the collection of important information.
Custom fields not only help standardize work but also organize data for reporting purposes. With them, you can more easily analyze and monitor project progress and create reports tailored to your company’s needs.
If you need help with implementing or configuring ClickUp, don’t hesitate to contact us. We’re ready to support you in fully leveraging the potential of this tool. With ClickUp and proper use of custom fields, you can achieve a higher level of organization and efficiency in your work.

ClickUp List Views – What do they offer and how to use them?
One of ClickUp's strengths, contributing to the system’s flexibility and clarity, is the ability to add multiple views that let you see the task list from different perspectives. In this article,...

How to add ClickUp for Outlook – step by step
If you use Outlook and work with the ClickUp tool, you’ll definitely be interested in integrating these two applications. Thanks to the ClickUp for Outlook add-in, you can quickly turn emails into...

How to use Task Tray and Favourites
ClickUp offers two ways to quickly access your most important tasks: Task Tray and Favorites. These features allow easy access to various ClickUp elements, not just tasks. In this article, we will...